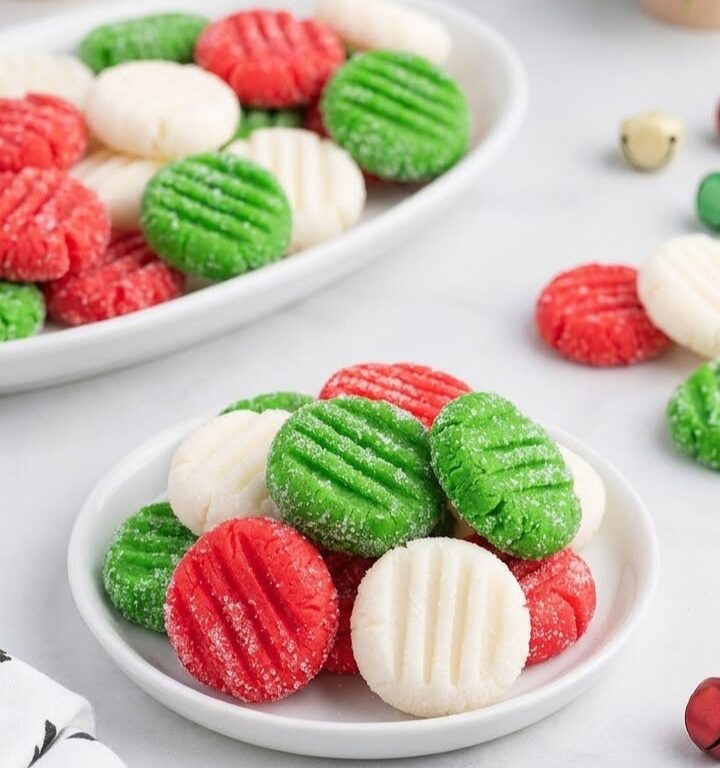
These homemade Christmas Mints are soft, creamy, and buttery little candies with a refreshing peppermint flavor. Made with cream cheese, powdered sugar, and peppermint extract, they have a smooth, melt-in-your-mouth texture and just the right amount of minty sweetness.
Their festive red, green, and white colors make them a beautiful addition to Christmas dessert trays, holiday candy boxes, and homemade gift baskets. Each mint is rolled in granulated sugar and gently pressed with a fork to create a charming striped pattern.
The best part? There’s no baking or cooking involved. The peppermint dough comes together in one mixing bowl, then gets divided, colored, and shaped into bite-sized candies. This recipe makes approximately 100 Christmas mints, making it a wonderful option for sharing during the holiday season.
Why You’ll Love This Recipe
- No baking required: These homemade Christmas mints come together without an oven, stovetop, or candy thermometer.
- Soft and creamy texture: Cream cheese and butter create a smooth, rich peppermint candy that melts in your mouth.
- Festive Christmas colors: Red, green, and white dough creates beautiful holiday candies that stand out on dessert trays.
- Simple ingredients: The recipe uses familiar ingredients, including cream cheese, butter, powdered sugar, and peppermint extract.
- Easy to customize: You can adjust the colors and decorative patterns to suit different holidays and celebrations.
- Perfect for sharing: One batch makes approximately 100 bite-sized mints, ideal for Christmas parties and homemade candy gifts.
Equipment
- Large rimmed baking sheet
- Parchment paper
- Large mixing bowl
- Handheld electric mixer
- Measuring cups and spoons
- Small bowl for granulated sugar
- Rubber spatula or wooden spoon
- Knife
- Fork
- Clean work surface
- Airtight storage container
- Refrigerator for storage
Ingredients
These easy Christmas Mints are made with a creamy peppermint dough, colorful food coloring, and a light granulated sugar coating. The red, green, and white candies are simple to shape and require no cooking.
- ⅓ cup granulated sugar, for coating
- 4 oz cream cheese, at room temperature
- 2 tablespoons unsalted butter, at room temperature
- 2 tablespoons light corn syrup (Karo brand used)
- 1 teaspoon peppermint extract
- 4¼–5 cups powdered sugar, divided
- 6 drops green liquid food coloring
- 6 drops red liquid food coloring
Ingredient Notes & Substitutions
Granulated sugar: Granulated sugar creates the lightly textured coating on the outside of each peppermint mint. Rolling the dough balls in sugar before pressing them with a fork helps create the classic appearance of these homemade candies. The recipe uses ⅓ cup for coating.
Cream cheese: Cream cheese gives Christmas mints their signature creamy consistency and a subtle tang that balances the sweetness of the powdered sugar. Use 4 ounces of regular cream cheese at room temperature so it blends smoothly with the butter and corn syrup. Full-fat block cream cheese is a suitable choice for this type of candy. Whipped cream cheese or cream cheese spread may produce a different consistency.
Unsalted butter: Softened butter adds richness and helps create a smooth peppermint dough. Use unsalted butter as specified in the recipe. The butter should be soft enough to mix easily with the cream cheese but should not be melted.
Light corn syrup: Light corn syrup helps bind the peppermint dough and contributes to its soft, smooth texture. The original recipe uses 2 tablespoons of Karo light corn syrup. Dark corn syrup is not recommended for the original appearance because its darker color and stronger flavor could affect the white and pastel-colored portions.
Peppermint extract: Peppermint extract provides the refreshing mint flavor that makes these candies so recognizable. The recipe calls for 1 teaspoon. Choose peppermint extract rather than spearmint flavoring for the traditional Christmas mint taste.
Powdered sugar: Powdered sugar sweetens and thickens the cream cheese mixture into a firm dough that can be rolled and shaped. The recipe uses 4¼–5 cups, divided. Start with 4¼ cups, then use the remaining sugar as needed during kneading to control stickiness. Avoid adding too much at once, as the dough should remain soft enough to shape.
Green and red food coloring: Liquid food coloring creates the traditional Christmas colors. The original recipe uses 6 drops of green coloring and 6 drops of red coloring, leaving the third portion of dough white. Liquid coloring can slightly soften the dough, so additional powdered sugar may be needed while kneading.
How to Make Christmas Mints
- Prepare the baking sheet and sugar coating. Line a large rimmed baking sheet with parchment paper. Place ⅓ cup granulated sugar in a small bowl and set it aside. You’ll use this sugar to coat the peppermint dough balls before shaping them.
- Beat the cream cheese mixture. In a large mixing bowl, combine 4 oz softened cream cheese, 2 tablespoons softened unsalted butter, 2 tablespoons light corn syrup, and 1 teaspoon peppermint extract. Using a handheld mixer on low speed, beat for approximately 1 minute, or until the mixture becomes smooth, creamy, and evenly combined.
- Gradually add the powdered sugar. Add 4¼ cups powdered sugar, approximately ½ cup at a time, mixing on low speed after each addition. Continue until the mixture thickens and forms a stiff peppermint dough. If it becomes too difficult to mix with the electric mixer, switch to a rubber spatula or wooden spoon.
- Prepare the work surface. Place a large sheet of parchment paper on a clean work surface. Sprinkle it with ¼ cup of the remaining powdered sugar, then transfer the peppermint dough onto the prepared surface. The powdered sugar helps prevent the dough from sticking while you work with it.
- Divide and color the dough. Divide the peppermint dough into three equal portions. Make a small indentation in the center of two portions. Add 6 drops of red liquid food coloring to the first portion and 6 drops of green liquid food coloring to the second portion. Leave the third portion white.
- Knead the colored dough. Knead the red portion until the food coloring is evenly distributed and the dough has a uniform color. If it becomes sticky, gradually work in up to ¼ cup additional powdered sugar. Repeat with the green dough. If needed, knead 1–2 tablespoons of powdered sugar into the white portion to achieve a similar consistency. Use the powdered sugar as needed rather than adding all of it automatically.
- Roll the dough into ropes. Roll each colored portion of peppermint dough into a long, even rope measuring approximately 18 inches in length and 1 inch in thickness. Try to keep the thickness consistent so the finished candies are similar in size.
- Cut the ropes into small pieces. Using a knife, slice each dough rope into ½-inch pieces. Repeat with the red, green, and white ropes until all the dough has been divided into small portions.
- Shape the peppermint balls. Roll each piece of peppermint dough between your palms to form a small, smooth ball. Keep the balls evenly sized for a consistent appearance.
- Coat the dough balls with sugar. Place 2–3 dough balls at a time into the bowl of granulated sugar. Gently toss until each ball is evenly coated, then transfer the coated balls to the prepared baking sheet, leaving a little space between them.
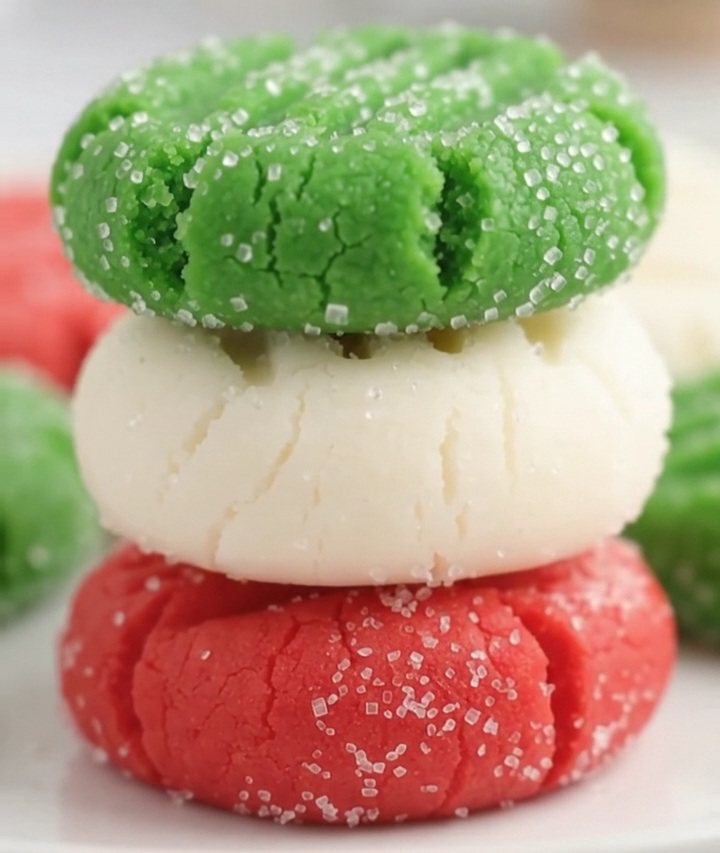
- Create the decorative fork pattern. Using the tines of a fork, gently press down on each sugar-coated ball to flatten it into a small, thick disc. The fork will leave a decorative striped pattern across the surface, giving the Christmas mints their traditional homemade appearance.
- Allow the mints to set. The original recipe specifies resting the shaped mints uncovered at room temperature for up to 24 hours, or until firm enough to handle. Food safety note: Because these candies contain cream cheese, they should not remain at room temperature for that long. Limit total unrefrigerated time to 2 hours and refrigerate for any extended setting period. Refrigerated drying may change the time and texture compared with the original method.
- Serve the Christmas mints. Once the candies have become firm enough to handle, carefully transfer them to a serving platter. Arrange the red, green, and white mints together for a colorful Christmas presentation.
Tips for Success
- Use room-temperature cream cheese and butter. Softened ingredients blend more easily and help create a smooth, lump-free peppermint dough. Avoid using melted butter, which can change the mixture’s consistency.
- Add powdered sugar gradually. Start with 4¼ cups and add the remaining sugar only as needed. Mixing in approximately ½ cup at a time helps create a consistent dough without making it unnecessarily stiff.
- Adjust sticky dough carefully. Liquid food coloring can soften the mixture. If the red or green dough becomes sticky, gradually knead in additional powdered sugar until it’s easier to handle.
- Keep the dough portions evenly sized. Divide the mixture into three equal portions before coloring, then roll each into a rope of similar thickness for consistent candy sizes.
- Roll the balls before coating. Shape each piece into a smooth ball before tossing it in granulated sugar. This helps create a neat, rounded appearance when flattened.
- Press gently with the fork. You only need enough pressure to flatten the balls into thick discs and create visible lines. Pressing too firmly may make the candies too thin.
- Handle the cream cheese filling safely. The original instructions allow extended room-temperature drying, but cream cheese is perishable. Refrigerate the candies for longer setting periods rather than leaving them out overnight.
Variations
These optional variations are simple ways to customize the flavor and appearance of your Christmas Mints. They are not part of the original recipe and may require additional or substituted ingredients.
- All-white peppermint mints: Skip the red and green food coloring and leave the entire batch white for a classic, elegant appearance. The peppermint flavor stays the same.
- Pastel Christmas mints: Use fewer drops of red and green food coloring to create softer pink and light green shades instead of bright holiday colors.
- Red and green holiday mints: Divide the dough into two portions instead of three and color one red and the other green for a bold Christmas candy assortment.
- Vanilla cream cheese mints: Replace the peppermint extract with vanilla extract for a sweet, creamy candy without the traditional mint flavor. This changes the original recipe’s flavor profile.
- Holiday sprinkle mints: Add a few festive sprinkles to the surface of the shaped candies for an additional decorative touch. Keep the original granulated sugar coating if you want the classic texture.
How to Store
Because these homemade Christmas Mints contain cream cheese and butter, proper storage is important for keeping the candies fresh and maintaining their soft, creamy texture.
Refrigerator Storage
Once the mints have set, transfer them to an airtight container and store them in the refrigerator.
If stacking the candies, place parchment paper between the layers to help protect the fork patterns and prevent the pieces from sticking together.
Refrigerator storage duration: [Not provided].
Keep the container refrigerated until you’re ready to serve the mints.
Room Temperature Storage
The original recipe calls for the shaped mints to dry uncovered at room temperature for up to 24 hours. However, because the candies contain cream cheese, extended room-temperature storage is not recommended.
For food safety, limit the total time outside refrigeration to 2 hours, including preparation, setting, and serving.
Use refrigeration for extended setting rather than leaving the mints uncovered overnight at room temperature.
Freezer Storage
The supplied recipe does not include tested freezing instructions or a recommended freezer storage duration.
Freezer storage duration: [Not provided].
Freezing may be possible, but the cream cheese filling and sugar coating could change in texture after thawing.
Make-Ahead Preparation
These candies can be prepared ahead of a Christmas party or holiday gathering.
Once shaped, keep them refrigerated while they firm up, then transfer them to an airtight container for storage.
For serving, arrange the red, green, and white mints on a platter shortly before your guests arrive and refrigerate any leftovers promptly.
Serving Suggestions
- Christmas dessert trays: Arrange the colorful mints alongside Christmas cookies, homemade fudge, and other festive candies.
- Homemade holiday gifts: Package the properly chilled candies in decorative containers for Christmas gifts, letting recipients know they must be refrigerated.
- Holiday parties: Serve the red, green, and white mints on a small candy platter for a colorful addition to your dessert table.
- After-dinner treats: Enjoy a mint after dinner for a sweet, refreshing peppermint finish.
- Coffee and hot chocolate: Pair these creamy peppermint candies with a warm cup of coffee or hot chocolate.
- Christmas candy assortments: Combine the mints with chocolate truffles, peppermint patties, and other homemade holiday treats for a variety of flavors and textures.
With approximately 100 mints per batch, this recipe is especially convenient for Christmas gatherings, festive dessert assortments, and homemade candy gifts.
Frequently Asked Questions
What are Christmas Mints?
Christmas Mints are soft, creamy peppermint candies traditionally prepared with ingredients such as cream cheese, butter, powdered sugar, and peppermint extract.
This version features festive red, green, and white colors, a light granulated sugar coating, and decorative fork marks on each small candy.
They’re a no-bake treat that’s especially popular for Christmas dessert trays and homemade holiday gifts.
Do Christmas Mints need to be baked?
No. These Christmas Mints are completely no-bake.
The ingredients are mixed into a stiff peppermint dough, divided into portions, colored, rolled into small balls, and flattened with a fork.
The candies then need time to firm up before serving.
Why is my peppermint dough too sticky?
The dough may become sticky if it hasn’t incorporated enough powdered sugar or if the liquid food coloring softens the mixture.
Start with 4¼ cups powdered sugar as directed.
While kneading the colored portions, gradually add the remaining powdered sugar as needed until the dough becomes firm enough to roll and shape without sticking excessively.
Avoid adding too much sugar at once because the candies should remain soft and creamy.
Can I use gel food coloring instead of liquid food coloring?
Gel food coloring may be used as an optional variation, but the original recipe specifically uses 6 drops of red liquid food coloring and 6 drops of green liquid food coloring.
Gel coloring is more concentrated, so the same number of drops may produce a different color intensity.
Start with a small amount and adjust the color gradually.
How long do Christmas Mints need to dry?
The recipe lists an initial resting time of 1 hour, while the shaping instructions allow up to 24 hours for the mints to become firm enough to handle.
However, these candies contain cream cheese, so they should not be left at room temperature for an extended period.
Use the refrigerator for longer setting periods and check the texture before serving. Refrigeration may affect the exact setting time.
Can I make Christmas Mints ahead of time?
Yes. These no-bake candies can be prepared ahead of a holiday gathering.
Once the mints are shaped and sufficiently firm, transfer them to an airtight container and keep them refrigerated until ready to serve.
The original recipe does not provide a specific refrigerated storage duration.
Recipe Card

Christmas Mints
Equipment
- Large rimmed baking sheet
- Parchment paper
- Large mixing bowl
- Handheld electric mixer
- Measuring cups and spoons
- Small bowl
- Rubber spatula or wooden spoon
- Knife
- Fork
- Clean work surface
- Refrigerator
- Airtight storage container
Ingredients
- ⅓ cup granulated sugar for coating
- 4 oz cream cheese at room temperature
- 2 tablespoons unsalted butter at room temperature
- 2 tablespoons light corn syrup (Karo brand used)
- 1 teaspoon peppermint extract
- 4¼–5 cups powdered sugar divided
- 6 drops green liquid food coloring
- 6 drops red liquid food coloring
Instructions
- Line a large rimmed baking sheet with parchment paper. Place the granulated sugar in a small bowl and set aside for coating the mints.
- In a large mixing bowl, combine the softened cream cheese, unsalted butter, light corn syrup, and peppermint extract. Using a handheld mixer on low speed, beat for approximately 1 minute, or until smooth and creamy.
- Gradually add 4¼ cups powdered sugar, about ½ cup at a time, mixing on low speed after each addition. As the mixture thickens into a stiff dough, switch to a spatula or wooden spoon if needed.
- Place a large sheet of parchment paper on a clean work surface and sprinkle it with ¼ cup of the remaining powdered sugar. Transfer the peppermint dough onto the prepared surface.
- Divide the dough into three equal portions. Make a small indentation in the center of two portions. Add 6 drops red food coloring to the first portion and 6 drops green food coloring to the second. Leave the third portion white.
- Knead the red dough until the color is evenly distributed. If sticky, gradually work in up to ¼ cup additional powdered sugar. Repeat with the green dough. If needed, knead 1–2 tablespoons powdered sugar into the white dough to achieve a similar consistency.
- Roll each colored portion of dough into a long rope measuring approximately 18 inches in length and 1 inch in thickness.
- Using a knife, slice each rope into ½-inch pieces. Repeat with all three dough ropes.
- Roll each piece of peppermint dough between your palms to form a small, smooth ball.
- Place 2–3 dough balls at a time into the bowl of granulated sugar and gently toss until evenly coated. Transfer to the prepared baking sheet, leaving a little space between the candies.
- Using the tines of a fork, gently press down on each sugar-coated ball to flatten it into a small, thick disc with a decorative striped pattern.
- Allow the Christmas Mints to set until firm enough to handle. The original recipe specifies uncovered room-temperature drying for up to 24 hours, but because the mints contain cream cheese, do not leave them unrefrigerated that long. Refrigerate for extended setting and limit total time at room temperature to 2 hours.
- Once the mints have set, transfer them to a serving platter and enjoy.