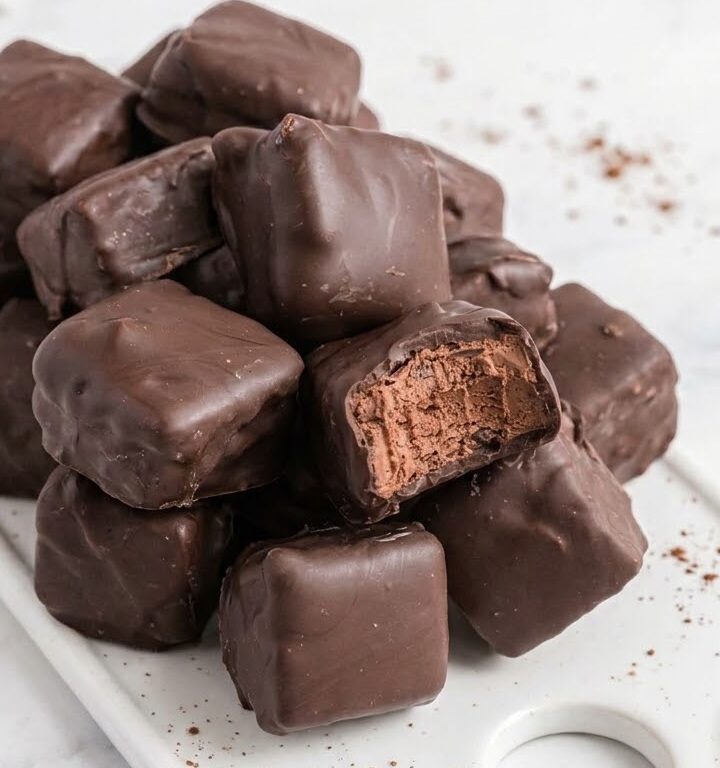
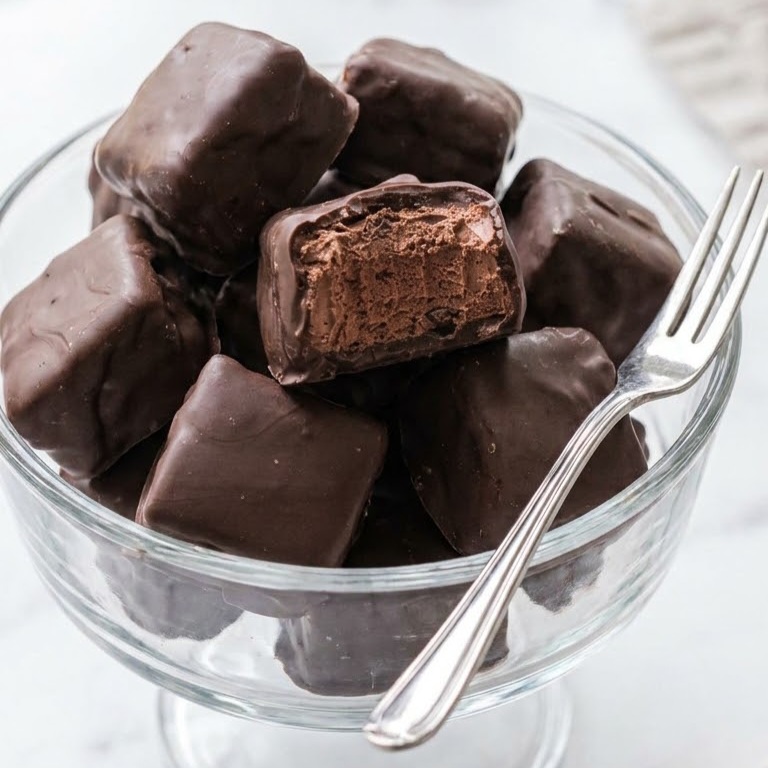
This Cool Whip Candy is a delicious homemade chocolate treat with a light, fluffy center surrounded by a rich dark chocolate coating. With a soft, creamy texture similar to a Three Musketeers candy bar, every bite combines smooth milk chocolate, airy Cool Whip, and a satisfying chocolate shell.
The best part? You only need three ingredients and no oven to make these homemade candies. The filling comes together by folding melted milk chocolate into thawed Cool Whip, then freezing the mixture until firm enough to cut and dip into dark chocolate.
Perfect for Christmas dessert trays, holiday gift boxes, parties, or an easy homemade sweet treat, these chocolate candies are especially delicious when served cold. This recipe makes 36 individual pieces, making it a wonderful option for sharing with family and friends.
Why You’ll Love This Recipe
- Only three ingredients: Milk chocolate chips, Cool Whip, and dark chocolate melting wafers are all you need.
- No baking required: The chocolate melts in the microwave, and the candies firm up in the freezer.
- Light and fluffy center: Cool Whip creates a soft, airy chocolate filling reminiscent of Three Musketeers candy bars.
- Rich chocolate coating: A smooth layer of dark chocolate surrounds the creamy milk chocolate center.
- Perfect for holiday gifting: These homemade candies make delicious additions to Christmas dessert trays and candy boxes.
- Great for making ahead: The candies can be stored in the freezer for up to 30 days and served whenever you’re ready.
Equipment
- Large microwave-safe bowl
- Large mixing bowl
- Microwave
- 8 × 8-inch square baking dish
- Parchment paper
- Rubber spatula
- Measuring cups
- Baking sheet
- Sharp knife
- Fork or dipping tool
- Freezer
- Freezer-safe airtight container
Ingredients
You only need three simple ingredients to make this easy Cool Whip Candy. Milk chocolate and Cool Whip create the soft, fluffy filling, while dark chocolate melting wafers form the rich outer coating.
Chocolate Candy Filling
- 2 packages (11 oz each) milk chocolate chips, 22 oz total
- 1 container (8 oz) Cool Whip, thawed
Chocolate Coating
- 24 oz Ghirardelli dark chocolate melting wafers
Ingredient Notes & Substitutions
Milk chocolate chips: Milk chocolate provides the sweet, creamy chocolate flavor of the candy filling. The original recipe uses two 11-ounce packages, totaling 22 ounces. Good-quality chocolate chips, such as Ghirardelli, are recommended for smooth melting and rich flavor. Allow the melted chocolate to cool to room temperature before mixing it with the Cool Whip to help maintain the filling’s fluffy texture.
Cool Whip: Cool Whip is the key ingredient that gives these candies their light, airy consistency. Make sure the entire 8-ounce container is completely thawed before combining it with the melted chocolate. Frozen or partially thawed Cool Whip can make the mixture difficult to fold evenly. For the closest result, use the original whipped topping rather than substituting homemade whipped cream, which may behave differently when mixed with chocolate and frozen.
Ghirardelli dark chocolate melting wafers: Dark chocolate melting wafers create the smooth outer coating that surrounds the fluffy chocolate filling. Their rich chocolate flavor balances the sweeter milk chocolate center. Melting wafers are designed for coating and setting, making them especially convenient for homemade candy. Milk chocolate melting wafers can be used as an optional variation for a sweeter finish, although the flavor will differ from the original recipe.
How to Make Cool Whip Candy
- Melt the milk chocolate chips. Place 22 oz milk chocolate chips in a large microwave-safe bowl. Microwave for 1 minute, then remove the bowl and stir thoroughly to begin melting the chocolate.
- Continue melting the chocolate. Return the bowl to the microwave for another 30 seconds. Remove and stir until the chocolate is completely melted and smooth. If necessary, microwave for an additional 15 seconds, stirring again until no unmelted pieces remain.
- Cool the melted chocolate. Allow the chocolate to cool to room temperature for approximately 20 minutes. This step is important because the chocolate should no longer be hot when combined with the Cool Whip.
- Prepare the baking dish. Line an 8 × 8-inch square baking dish with parchment paper. Leave enough parchment around the edges to make removing the candy easier after freezing, then set the dish aside.
- Combine the chocolate and Cool Whip. Place the 8 oz thawed Cool Whip in a large mixing bowl. Add the cooled melted milk chocolate and gently fold the ingredients together using a rubber spatula. Continue folding until the mixture is evenly combined. Small hardened chocolate pieces may form during mixing, which is completely normal.
- Spread the filling into the pan. Transfer the chocolate and Cool Whip mixture into the prepared baking dish. Use a spatula to spread it evenly across the bottom, creating a smooth layer with a relatively even thickness.
- Freeze the chocolate filling. Place the baking dish in the freezer for 30 minutes, or until the mixture becomes firm enough to cut into individual pieces.
- Cut into squares. Remove the candy from the freezer. Carefully lift the filling from the baking dish and use a sharp knife to cut it into 36 equal squares.
- Freeze the individual pieces. Arrange the chocolate squares on a parchment-lined baking sheet, leaving a little space between each piece. Return them to the freezer for at least 30 minutes, or until completely firm. This helps the candy maintain its shape during dipping.
- Melt the dark chocolate coating. Place the 24 oz Ghirardelli dark chocolate melting wafers in a suitable bowl. Melt according to the package directions, stirring until the chocolate is completely melted and smooth.
- Dip the frozen candy squares. Remove the chilled chocolate squares from the freezer. Using a fork or dipping tool, carefully dip each piece into the melted dark chocolate, turning it gently until completely coated on all sides. Lift each piece out and allow any excess chocolate to drip back into the bowl.
- Allow the chocolate coating to set. Transfer the chocolate-covered candies onto a parchment-lined baking sheet. Let the dark chocolate coating set completely before handling or storing the candies.
- Freeze until ready to serve. Once the chocolate coating has set, keep the finished Cool Whip Candy in the freezer until you’re ready to enjoy it. Serve the candies cold for the best texture and consistency.
Tips for Success
- Use good-quality chocolate. Milk chocolate is the main ingredient in the filling, so choose chocolate chips that melt smoothly. Ghirardelli milk chocolate chips are a good option for a rich chocolate flavor.
- Let the melted chocolate cool completely. Allow the chocolate to reach room temperature for approximately 20 minutes before adding it to the Cool Whip. Mixing hot chocolate with the whipped topping can affect the filling’s texture.
- Make sure the Cool Whip is fully thawed. Thawed Cool Whip is easier to fold into the cooled chocolate and helps create a more evenly combined filling.
- Fold the mixture gently. Use a spatula and gentle folding motions rather than vigorous stirring. Tiny hardened chocolate pieces may appear during mixing, and that’s normal.
- Don’t skip either freezing step. Freeze the filling for 30 minutes before cutting, then freeze the individual squares for at least another 30 minutes. Firm pieces are much easier to handle and dip into melted chocolate.
- Coat each piece completely. Make sure the dark chocolate covers every side of the frozen filling. Allow excess chocolate to drip away before placing the candy on parchment paper.
- Keep the candies frozen. These homemade candies maintain their best texture when stored in the freezer. Serve them cold rather than allowing them to soften at room temperature.
Variations
These optional variations are simple ways to customize your Cool Whip Candy. They are not part of the original three-ingredient recipe and may require additional or substituted ingredients.
- Cool Whip chocolate truffles: Instead of spreading the filling into a square baking dish, drop tablespoon-sized portions onto a parchment-lined baking sheet. Freeze for 1 hour, then dip each frozen truffle into melted chocolate for a round, bite-sized treat.
- Milk chocolate-coated candy: Replace the dark chocolate melting wafers with milk chocolate melting wafers for a sweeter coating that complements the fluffy milk chocolate center.
- White chocolate-coated candy: Use white chocolate melting wafers instead of dark chocolate for a lighter-colored candy with a sweeter finish. Follow the coating’s package instructions for melting.
- Sea salt chocolate candy: Sprinkle a tiny amount of flaky sea salt over the freshly dipped candies before the chocolate coating sets for a delicious sweet-and-salty contrast.
- Christmas Cool Whip Candy: Add festive red and green sprinkles to the melted chocolate coating before it hardens. This creates colorful homemade candies for Christmas dessert trays and holiday gift boxes.
How to Store
Cool Whip Candy should be stored in the freezer to maintain its fluffy filling and firm chocolate coating.
Freezer Storage
Once the chocolate coating has completely set, transfer the candies to a freezer-safe airtight container.
If stacking the pieces, place parchment paper between the layers to prevent the chocolate coatings from sticking together.
Store the finished candies in the freezer for up to 30 days, as specified in the original recipe.
Refrigerator Storage
The original recipe recommends keeping the finished candies frozen rather than refrigerated.
Because the filling contains Cool Whip, the candies may soften and lose their intended texture if stored at a warmer temperature.
For the best results, keep them in the freezer until ready to serve.
Serving from the Freezer
These homemade candies taste best when served cold.
Remove the desired number of pieces from the freezer when you’re ready to enjoy them. The chilled filling provides the light, creamy texture that makes this candy special.
Make-Ahead Preparation
Cool Whip Candy is a convenient make-ahead dessert because the finished pieces can remain frozen until needed.
Prepare the candies in advance, allow the chocolate coating to set completely, and store them in an airtight freezer-safe container for up to 30 days.
Serving Suggestions
- Christmas dessert trays: Arrange the frozen candies alongside Christmas cookies, homemade fudge, and other holiday sweets for a festive dessert selection.
- Homemade holiday gifts: Package the candies in freezer-safe containers for homemade gifts, making sure recipients know to keep them frozen.
- Chocolate candy assortments: Combine the Cool Whip Candy with homemade chocolate truffles, peanut butter balls, and other bite-sized treats for a delicious variety.
- Family movie nights: Serve a few chilled pieces as a sweet chocolate treat while watching your favorite movies.
- After-dinner desserts: Enjoy one or two pieces directly from the freezer for a rich, creamy chocolate dessert.
- Holiday parties: Arrange small batches of the frozen candies on a serving platter shortly before serving, keeping the remaining pieces in the freezer.
Since this recipe yields 36 individual candies, it’s especially convenient for preparing homemade treats for family gatherings, holiday celebrations, and dessert assortments.
Frequently Asked Questions
What is Cool Whip Candy?
Cool Whip Candy is a homemade chocolate treat made with melted milk chocolate and thawed Cool Whip, then coated in dark chocolate.
The combination creates a light, fluffy chocolate filling surrounded by a rich chocolate shell. Its texture is reminiscent of a Three Musketeers candy bar.
Can I use homemade whipped cream instead of Cool Whip?
Cool Whip is recommended because it’s the whipped topping specifically used in the original recipe.
Homemade whipped cream has a different composition and may not produce the same consistency when mixed with melted chocolate and frozen.
For the closest result, use an 8-ounce container of thawed Cool Whip.
Why does my chocolate form small hard pieces when mixed with Cool Whip?
Small hardened chocolate pieces can develop when the cooled melted chocolate comes into contact with the colder whipped topping.
This is normal for this recipe. Continue folding gently until the mixture is evenly incorporated.
Make sure the chocolate has cooled to room temperature before combining it with the Cool Whip.
Why do I need to freeze the candy twice before dipping?
The first 30-minute freezing period firms up the chocolate filling enough to cut it into individual squares.
The second freezing period of at least 30 minutes helps the cut pieces become completely firm.
This makes them easier to handle and prevents them from losing their shape when dipped into warm melted dark chocolate.
Can I make Cool Whip Candy into truffles instead of squares?
Yes. The original recipe includes a truffle variation.
Instead of spreading the chocolate filling into a baking dish, drop tablespoon-sized portions onto a parchment-lined baking sheet.
Freeze for 1 hour, then dip the frozen truffles into melted chocolate until completely coated.
How long does homemade Cool Whip Candy last?
According to the original recipe, Cool Whip Candy can be stored in the freezer for up to 30 days.
Keep the finished candies in a freezer-safe airtight container and serve them cold for the best texture.
Recipe Card
Cool Whip Candy
Equipment
- Large microwave-safe bowl
- Large mixing bowl
- Microwave
- 8 × 8-inch square baking dish
- Parchment paper
- Rubber spatula
- Measuring cups
- Baking sheet
- Sharp knife
- Fork or dipping tool
- Freezer
- Freezer-safe airtight container
Ingredients
Chocolate Candy Filling
- 2 packages (11 oz each) milk chocolate chips, 22 oz total
- 1 container (8 oz) Cool Whip, thawed
Chocolate Coating
- 24 oz Ghirardelli dark chocolate melting wafers
Instructions
- Place the milk chocolate chips in a large microwave-safe bowl. Microwave for 1 minute, then remove and stir thoroughly.
- Return the bowl to the microwave for another 30 seconds. Stir until the chocolate is completely melted and smooth. If necessary, microwave for an additional 15 seconds.
- Allow the melted chocolate to cool to room temperature for approximately 20 minutes.
- Line an 8 × 8-inch square baking dish with parchment paper and set aside.
- In a large mixing bowl, gently fold the cooled melted milk chocolate into the thawed Cool Whip until fully combined. Tiny hardened chocolate pieces may form during mixing, which is normal. Continue folding gently until evenly incorporated.
- Transfer the chocolate and Cool Whip mixture into the prepared baking dish, spreading it evenly to create a smooth layer.
- Place the baking dish in the freezer for 30 minutes, or until the mixture is firm enough to cut.
- Remove the candy from the freezer and cut it into 36 equal squares.
- Arrange the squares on a parchment-lined baking sheet and return them to the freezer for at least 30 minutes to firm up completely.
- Melt the Ghirardelli dark chocolate wafers according to the package directions until smooth.
- Remove the chilled candy squares from the freezer. Dip each piece into the melted dark chocolate, making sure it is completely coated on all sides.
- Place the chocolate-covered candies onto a parchment-lined baking sheet and allow the chocolate coating to set.
- Keep the finished candies in the freezer until ready to serve. Enjoy them cold for the best texture.