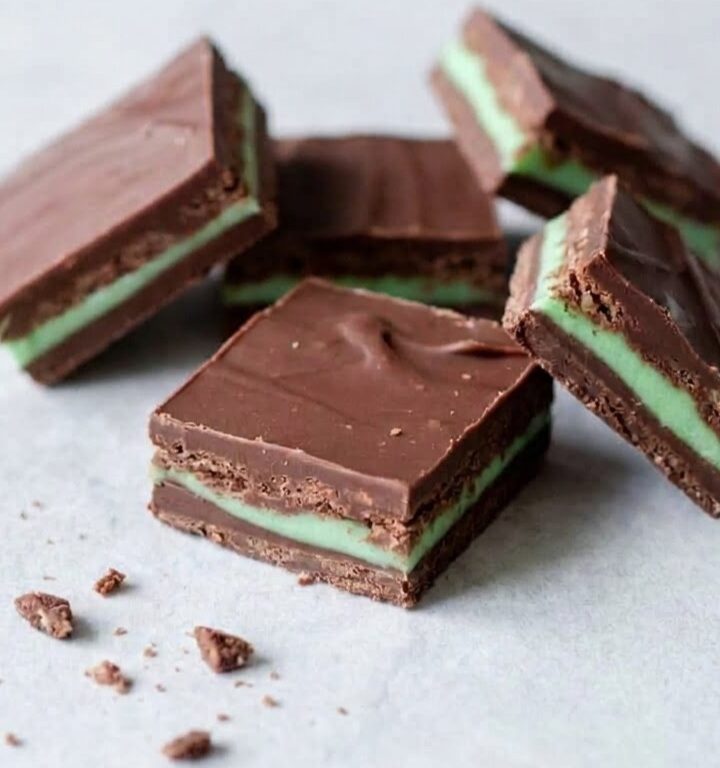
These Homemade Andes Mints are a delicious combination of rich chocolate and refreshing peppermint, with three beautiful layers that make every bite special. A smooth, mint-flavored white chocolate center sits between two layers of dark chocolate, creating the familiar chocolate-mint flavor of classic after-dinner candies.
The soft green middle layer gives these little treats their signature appearance, while the combination of creamy white chocolate and rich dark chocolate creates a satisfying, melt-in-your-mouth texture.
Making these layered chocolate mints at home is surprisingly simple. The chocolate melts gently in a warm oven, and each layer is spread into a baking pan before the candies are allowed to set. They’re perfect for Christmas dessert trays, holiday parties, homemade gifts, or a sweet after-dinner treat.
Why You’ll Love This Recipe
- Classic chocolate-mint flavor: Rich dark chocolate and refreshing peppermint create a delicious combination reminiscent of traditional Andes Mints.
- Beautiful three-layer appearance: Two smooth chocolate layers surround a creamy green peppermint center.
- Simple ingredients: You only need chocolate chips, peppermint extract, and green food coloring.
- No baking required: The oven is used only to gently melt the chocolate before assembling the layers.
- Easy to customize: Dark, milk, or semisweet chocolate can be used depending on your preferred sweetness.
- Perfect for holiday gifting: These homemade chocolate mints look beautiful in Christmas candy boxes and festive dessert trays.
Equipment
- 3 small to medium oven-safe bowls
- Spatulas
- 8 × 8-inch or 9 × 9-inch baking pan
- Parchment paper
- Measuring spoons
- Oven
- Cutting board
- Sharp knife
Ingredients
These easy Homemade Andes Mints are made with two types of chocolate, peppermint extract, and a little green food coloring. The three layers create a delicious combination of rich chocolate and creamy mint flavor.
Chocolate Layers
- 12 oz dark chocolate chips, divided into two 6 oz portions (milk or semi-sweet chocolate may also be used)
- 7 oz white chocolate chips or vanilla candy melts
Peppermint Flavoring
- ¾ teaspoon pure peppermint extract, divided
- 4 drops green food coloring
Ingredient Notes & Substitutions
Dark chocolate chips: Dark chocolate creates the rich outer layers of these homemade mint candies. Its deep chocolate flavor balances the sweeter white chocolate center and refreshing peppermint.
You’ll need 12 ounces of dark chocolate chips, divided into two equal 6-ounce portions. One portion forms the bottom layer, while the other creates the smooth chocolate topping.
Milk chocolate or semisweet chocolate chips can also be used if you prefer a sweeter or milder chocolate flavor. For a classic chocolate-mint combination, dark chocolate is an excellent choice.
White chocolate chips: White chocolate creates the creamy middle layer that gives Homemade Andes Mints their distinctive appearance. Its sweet, mellow flavor pairs beautifully with the peppermint extract and contrasts with the dark chocolate layers.
Use 7 ounces of white chocolate chips. Vanilla candy melts are another convenient option, especially when creating a smooth, colored candy layer.
Pure peppermint extract: Peppermint extract adds the cool, refreshing mint flavor throughout all three layers.
The recipe uses ¾ teaspoon total, divided into three portions of ¼ teaspoon each. Adding peppermint to every layer creates a balanced mint flavor rather than concentrating it only in the green center.
Choose pure peppermint extract for the familiar flavor of chocolate mint candies. Spearmint extract has a different taste and won’t create the same result.
Green food coloring: Green food coloring gives the white chocolate center its recognizable mint-green appearance.
Four drops create the colored middle layer. Stir thoroughly until the color is evenly distributed and no streaks remain.
For the smoothest chocolate mixture, choose food coloring specifically formulated for use with chocolate. Some water-based liquid colorings can cause melted white chocolate to thicken or seize.
How to Make Homemade Andes Mints
- Prepare the oven. Preheat your oven to 200°F, then reduce the temperature to the warm setting. The gentle heat will help melt the chocolate without exposing it to excessively high temperatures.
- Divide the chocolate into three bowls. Measure 12 oz dark chocolate chips and divide them into two equal portions of 6 oz each. Place each portion in a separate small oven-safe bowl. Add 7 oz white chocolate chips to a third oven-safe bowl.
- Gently melt the chocolate. Place all three bowls in the warm oven for approximately 15–20 minutes. Allow the chocolate to soften and melt gently. The chocolate may retain some of its shape even after softening, so it should become smooth when stirred.
- Prepare the baking pan. Meanwhile, line an 8 × 8-inch or 9 × 9-inch baking pan with parchment paper. Cut and adjust the corners so the parchment fits neatly against the bottom and sides. Leave enough parchment to make removing the finished candy easier.
- Flavor the first dark chocolate layer. Remove one bowl of melted dark chocolate from the oven. Add ¼ teaspoon pure peppermint extract and stir thoroughly until the chocolate is smooth and the peppermint is evenly incorporated.
- Spread the bottom chocolate layer. Pour the peppermint-flavored dark chocolate into the prepared baking pan. Using a spatula, gently spread it across the entire bottom to create a smooth, uniform layer. Work carefully to keep the thickness as even as possible.
- Allow the first layer to rest. Let the chocolate rest for approximately 2 minutes. The surface should remain slightly glossy and soft rather than becoming completely matte or hardened. This helps the next layer adhere to the chocolate underneath.
- Prepare the green peppermint layer. Remove the bowl of melted white chocolate from the oven. Add ¼ teaspoon peppermint extract and 4 drops green food coloring. Stir gently until the chocolate becomes smooth and the green color is evenly distributed throughout the mixture.
- Spread the green chocolate layer. Carefully pour the green peppermint chocolate over the first dark chocolate layer. Using a spatula, gently spread it across the surface to create a smooth, even middle layer. Work with light movements to avoid mixing the green chocolate into the darker layer underneath.
- Allow the middle layer to rest. Let the green chocolate layer rest for another 2 minutes. It should begin to settle while remaining soft enough for the final chocolate layer to adhere.
- Flavor the remaining dark chocolate. Remove the second bowl of melted dark chocolate from the oven. Add the final ¼ teaspoon peppermint extract and stir thoroughly until the chocolate is smooth and evenly flavored.
- Add the final chocolate layer. Slowly pour the peppermint-flavored dark chocolate over the green middle layer. Use a spatula to carefully spread it across the entire surface, creating a smooth, even top layer without disturbing the green chocolate underneath.
- Allow the chocolate to set. Leave the layered chocolate at room temperature until the top surface changes from glossy to completely matte. This indicates that the chocolate has set enough to handle.
- Remove the candy from the pan. Once the chocolate layers have set, carefully lift the candy out of the baking pan using the parchment paper. Transfer it to a cutting board, keeping the three layers intact.
- Cut into individual candies. Using a sharp knife, cut the layered chocolate into long strips. Slice the strips into small squares or rectangles of your preferred size. Each piece should reveal the beautiful green peppermint center between the two dark chocolate layers.
- Serve and enjoy. Arrange the Homemade Andes Mints on a serving platter or transfer them to a candy container. Enjoy their rich chocolate flavor and refreshing peppermint finish.
Tips for Success
- Melt the chocolate gently. Use the oven’s warm setting to soften the chocolate slowly. If your oven runs cool, keeping it at 200°F may be necessary. Avoid exposing the chocolate to excessive heat, which can cause scorching or an uneven texture.
- Divide the chocolate evenly. Measure the dark chocolate into two separate 6-ounce portions before melting. This helps create balanced top and bottom layers.
- Distribute the peppermint extract carefully. Add exactly ¼ teaspoon to each of the three layers. This creates an even peppermint flavor throughout the candies.
- Use chocolate-compatible food coloring. White chocolate can react poorly to water-based coloring. A candy-safe green coloring helps maintain a smooth consistency while creating the mint-green center.
- Spread each layer gently. Use light, controlled spatula movements, especially when adding the green center and final chocolate topping. This helps prevent the layers from blending together.
- Don’t let the layers harden too early. Allow the first and second layers to rest for approximately 2 minutes before adding the next layer. They should remain slightly soft so the layers can adhere properly.
- Wait until the chocolate has set before slicing. The top layer should lose its glossy appearance and become completely matte before removing the candy from the pan. Use a sharp knife to create neat pieces with visible layers.
Variations
These optional variations are simple ways to customize the flavor and appearance of your Homemade Andes Mints.
- Milk chocolate Andes Mints: Replace the dark chocolate chips with milk chocolate chips for sweeter, creamier outer layers. This variation is especially appealing if you prefer a milder chocolate flavor.
- Semisweet chocolate mint candy: Use semisweet chocolate chips instead of dark chocolate for a balanced chocolate flavor that complements the sweet peppermint center.
- Extra-dark chocolate mints: Choose darker chocolate chips for a deeper, more intense chocolate flavor that contrasts with the white chocolate filling.
- White peppermint chocolate mints: Leave out the green food coloring for a white peppermint center between the two chocolate layers. The flavor stays the same, but the candies have a different appearance.
- Christmas chocolate mint candy: Once the top chocolate layer is spread, add a small amount of festive holiday sprinkles before it sets for a decorative Christmas finish.
How to Store
Homemade Andes Mints are best stored in a cool, dry place to help preserve their smooth chocolate texture and keep the three layers intact.
Room Temperature Storage
Once the chocolate has completely set, place the sliced candies in an airtight container.
Keep them in a cool room away from direct sunlight, heat, and moisture. Chocolate can soften or develop a dull appearance when exposed to changing temperatures.
For the best flavor and texture, enjoy the candies within 1–2 weeks when stored under consistently cool, dry conditions.
If stacking the pieces, place parchment paper between the layers to prevent them from sticking together.
Refrigerator Storage
If your kitchen is warm, you can store the candies in the refrigerator.
Arrange them in an airtight container with parchment paper between layers if needed. Keep the container tightly closed to help protect the chocolate from moisture and refrigerator odors.
Before serving, allow the closed container to come closer to room temperature. This helps reduce condensation on the chocolate surface.
Freezer Storage
Homemade chocolate mints can also be frozen, although freezing and thawing may affect the appearance of the chocolate.
Place the completely set candies in a freezer-safe airtight container with parchment paper between layers. Wrap the container securely to minimize exposure to moisture.
For serving, transfer the sealed container to the refrigerator to thaw gradually. Avoid opening the container while the candies are still very cold, as condensation can develop on the chocolate.
Make-Ahead Preparation
These layered chocolate mints are convenient to prepare ahead of Christmas parties and holiday gatherings.
Make sure the chocolate has completely set before cutting, stacking, or packaging the candies. Store them in an airtight container until you’re ready to serve or give them as gifts.
Serving Suggestions
- After-dinner mints: Serve a few chocolate mint squares after dinner for a refreshing, sweet finish to a meal.
- Christmas dessert trays: Arrange the candies alongside Christmas cookies, homemade fudge, and other festive sweets.
- Homemade holiday gifts: Package the completely set mints in decorative candy boxes or holiday tins for thoughtful Christmas presents.
- Coffee and tea: Enjoy the chocolate mints with a cup of coffee, espresso, or hot tea for a delicious combination of flavors.
- Holiday parties: Arrange the bite-sized candies on a serving platter for guests to enjoy throughout the celebration.
- Homemade candy assortments: Pair the mints with chocolate truffles, peanut butter balls, and other homemade candies for a variety of flavors and textures.
The beautiful green center makes these little candies especially attractive when arranged on festive dessert platters or packaged in clear candy bags.
Frequently Asked Questions
What are Homemade Andes Mints?
Homemade Andes Mints are layered chocolate peppermint candies featuring a sweet green mint center between two chocolate layers.
The combination of dark chocolate, white chocolate, and peppermint extract creates a creamy, refreshing treat inspired by the familiar flavor and appearance of Andes after-dinner mints.
Can I use milk chocolate instead of dark chocolate?
Yes. Milk chocolate or semisweet chocolate chips can be used instead of dark chocolate.
Milk chocolate creates sweeter outer layers, while semisweet chocolate provides a more balanced chocolate flavor.
Use the same total amount of chocolate, dividing it into two equal portions for the top and bottom layers.
Why is my melted white chocolate becoming thick or grainy?
White chocolate can become thick or grainy if it overheats or comes into contact with water.
Melt it gently in the warm oven and stir carefully. Food coloring can also affect the texture, especially if it contains water.
For the smoothest green center, use coloring designed specifically for chocolate and avoid adding excess liquid.
How do I keep the three chocolate layers from mixing together?
Allow each layer to rest for approximately 2 minutes before adding the next one.
The chocolate should remain slightly glossy and soft rather than completely hardening.
When pouring the next layer, work slowly and spread it gently with a spatula to avoid disturbing the chocolate underneath.
How do I know when the chocolate mints are ready to cut?
The layered chocolate is ready to cut once it has set and the top surface has changed from glossy to completely matte.
Carefully lift the chocolate from the baking pan using the parchment paper, then cut it into strips and small squares or rectangles.
Avoid cutting while the layers are still soft, as this may cause them to smear together.
Can I make Homemade Andes Mints ahead of time?
Yes. These chocolate mint candies are a convenient make-ahead treat for Christmas parties, holiday dessert trays, and homemade gifts.
Allow the chocolate to set completely before cutting, then store the finished pieces in an airtight container in a cool, dry place.
If your kitchen is warm, refrigeration can help maintain their shape.
Recipe Card
Homemade Andes Mints
Equipment
- 3 small to medium oven-safe bowls
- Spatulas
- 8 × 8-inch or 9 × 9-inch baking pan
- Parchment paper
- Measuring spoons
- Oven
- Cutting board
- Sharp knife
Ingredients
Chocolate Layers
- 12 oz dark chocolate chips, divided into two 6 oz portions (milk or semi-sweet chocolate may also be used)
- 7 oz white chocolate chips or vanilla candy melts
Peppermint Flavoring
- ¾ teaspoon pure peppermint extract, divided
- 4 drops green food coloring
Instructions
- Preheat the oven to 200°F, then reduce the temperature to the warm setting.
- Divide the dark chocolate chips into two equal portions of 6 oz each, placing them in separate small oven-safe bowls. Add the 7 oz white chocolate chips to a third oven-safe bowl.
- Place all three bowls in the warm oven for approximately 15–20 minutes, allowing the chocolate to melt gently.
- Meanwhile, line an 8 × 8-inch or 9 × 9-inch baking pan with parchment paper. Cut and adjust the corners so the parchment fits neatly against the bottom and sides.
- Remove one bowl of melted dark chocolate from the oven. Add ¼ teaspoon peppermint extract and stir thoroughly until smooth and evenly flavored.
- Pour the peppermint-flavored dark chocolate into the prepared baking pan. Using a spatula, spread it evenly across the bottom to create a smooth layer.
- Allow the first chocolate layer to rest for approximately 2 minutes, keeping it slightly glossy and not fully hardened.
- Remove the melted white chocolate from the oven. Add ¼ teaspoon peppermint extract and 4 drops green food coloring. Stir until smooth and evenly colored.
- Gently pour the green peppermint chocolate over the first dark chocolate layer. Carefully spread it into a smooth, uniform layer without mixing it into the chocolate underneath.
- Allow the green chocolate layer to rest for another 2 minutes, keeping it soft enough for the final layer to adhere.
- Remove the remaining bowl of melted dark chocolate from the oven. Add the final ¼ teaspoon peppermint extract and stir until completely incorporated.
- Slowly pour the peppermint-flavored dark chocolate over the green middle layer. Carefully spread it across the entire surface, creating a smooth, even top layer.
- Allow the layered chocolate to cool and set at room temperature until the top chocolate layer changes from glossy to completely matte.
- Once the chocolate has set, carefully lift it out of the baking pan using the parchment paper and transfer it to a cutting board.
- Using a sharp knife, cut the chocolate into long strips, then slice the strips into small squares or rectangles of your preferred size.
- Serve the Homemade Andes Mints and enjoy.