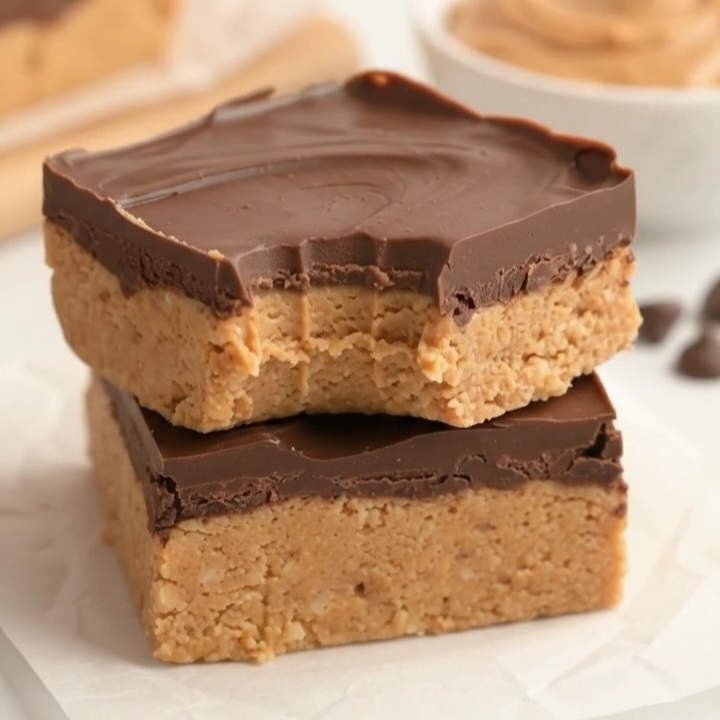
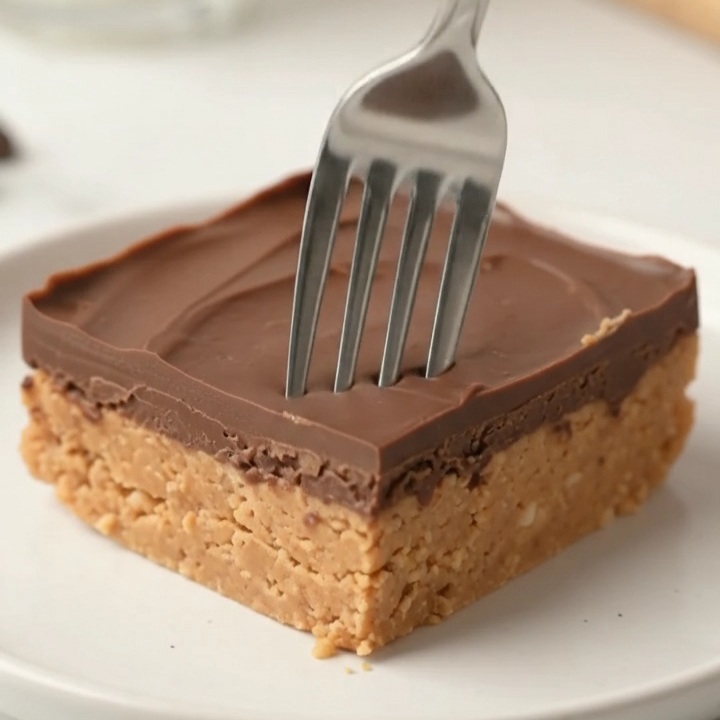
These Lunch Lady Peanut Butter Bars bring back the classic flavor of old-fashioned school cafeteria desserts. Made with a thick, sweet peanut butter and graham cracker base and topped with a smooth layer of semi-sweet chocolate, they’re rich, creamy, and packed with that irresistible chocolate-peanut butter combination.
The best part? There’s no baking involved. The peanut butter layer comes together in one mixing bowl, and the chocolate topping melts easily in the microwave. After just an hour in the refrigerator, the bars are firm enough to serve.
Perfect for potlucks, family gatherings, dessert trays, or an afternoon treat, these nostalgic peanut butter bars are easy to prepare with familiar pantry ingredients. This recipe makes 16 generous squares, each with a deliciously soft peanut butter center and a rich chocolate finish.
Why You’ll Love This Recipe
- No baking required: The peanut butter base comes together without an oven, and the chocolate topping melts in the microwave.
- Classic cafeteria-style flavor: These bars are inspired by the nostalgic peanut butter treats served in school lunchrooms.
- Rich chocolate and peanut butter combination: A thick, creamy peanut butter layer pairs perfectly with smooth semi-sweet chocolate.
- Simple ingredients: You only need six familiar ingredients to make the entire recipe.
- Quick preparation: Just 10 minutes of prep time before the bars go into the refrigerator.
- Perfect for sharing: One 9 × 9-inch pan makes 16 generous bars for parties, potlucks, and family desserts.
Equipment
- 9 × 9-inch baking dish
- Parchment paper
- Large mixing bowl
- Stand mixer or handheld mixer
- Microwave-safe bowl
- Measuring cups and spoons
- Rubber spatula
- Knife
- Refrigerator
Ingredients
These easy Lunch Lady Peanut Butter Bars have two delicious layers: a rich peanut butter and graham cracker base and a smooth chocolate-peanut butter topping.
Peanut Butter Base
- ¾ cup butter, melted
- 2 cups graham cracker crumbs
- 2 cups powdered sugar
- 1¼ cups creamy peanut butter
Chocolate Topping
- 2½ cups semi-sweet chocolate chips
- 3 tablespoons creamy peanut butter
Ingredient Notes & Substitutions
Butter: Melted butter helps bind the graham cracker crumbs, powdered sugar, and peanut butter together. It also adds richness to the base. Allow the butter to melt completely before combining it with the dry ingredients.
Graham cracker crumbs: These create the classic texture of Lunch Lady Peanut Butter Bars. They add a subtle graham cracker flavor and help give the peanut butter layer structure. Use finely crushed graham crackers or prepared graham cracker crumbs for an even consistency.
Powdered sugar: Powdered sugar sweetens the peanut butter base while helping create its thick, smooth texture. Granulated sugar is not a direct substitute because its larger crystals can make the mixture gritty.
Creamy peanut butter: Creamy peanut butter gives the bars their signature flavor and smooth consistency. The recipe uses 1¼ cups in the base and another 3 tablespoons in the chocolate topping. For the closest result, use a well-mixed, conventional creamy peanut butter. Natural peanut butter that separates may produce a different texture.
Semi-sweet chocolate chips: Semi-sweet chocolate balances the sweetness of the peanut butter layer and creates a rich topping. Milk chocolate chips can be used as an optional variation for a sweeter result, although the finished bars will taste different from the original recipe.
How to Make Lunch Lady Peanut Butter Bars
- Prepare the baking dish. Line a 9 × 9-inch baking dish with parchment paper and set it aside. The parchment paper will make it easier to remove the finished bars.
- Combine the base ingredients. In a large mixing bowl, add the ¾ cup melted butter, 2 cups graham cracker crumbs, and 2 cups powdered sugar. Using a stand mixer or handheld mixer, mix until the ingredients are thoroughly combined and evenly moistened.
- Add the peanut butter. Add 1¼ cups creamy peanut butter to the mixture. Continue mixing just until all the ingredients are fully incorporated and a thick, uniform peanut butter mixture forms.
- Press the base into the pan. Transfer the peanut butter mixture to the prepared baking dish. Use a spatula to press and spread it evenly across the bottom, creating a smooth, compact layer that reaches the corners.
- Prepare the chocolate topping. In a microwave-safe bowl, combine 2½ cups semi-sweet chocolate chips with the remaining 3 tablespoons creamy peanut butter.
- Melt the chocolate. Microwave in 30-second intervals, stirring thoroughly after each interval, until the chocolate is completely melted and the mixture becomes smooth and creamy.
- Spread the chocolate topping. Pour the melted chocolate mixture over the prepared peanut butter base. Use a spatula to spread it evenly across the entire surface, creating a smooth chocolate layer.
- Cut the bars before chilling. While the chocolate topping is still soft, use a knife to cut the mixture into 16 squares directly in the pan. Cutting before refrigeration makes the bars easier to portion once the chocolate becomes firm.
- Refrigerate until firm. Place the baking dish in the refrigerator for 1 hour, or until the peanut butter bars are completely firm and the chocolate topping has set.
- Rest and serve. Remove the bars from the refrigerator and allow them to sit at room temperature for 10–15 minutes before serving. This helps the peanut butter layer soften slightly for a creamier texture.
Tips for Success
- Use finely crushed graham crackers. Fine, evenly sized crumbs blend more easily with the butter and powdered sugar, creating a smoother peanut butter base.
- Mix just until combined. Once the peanut butter is added, mix until everything is fully incorporated. There’s no need to continue beating after the mixture becomes uniform.
- Press the base firmly. Spread the peanut butter mixture evenly and press it into a compact layer so the finished bars hold together when sliced.
- Melt the chocolate gradually. Microwave in 30-second intervals and stir thoroughly after each interval to prevent the chocolate from overheating or scorching.
- Spread the chocolate while warm. Pour the melted topping over the base immediately so it’s easy to spread into an even layer.
- Cut before refrigerating. Score and cut the bars while the chocolate is still soft to make portioning easier and reduce the chance of cracking the firm topping.
- Let the bars rest before serving. Allowing them to sit at room temperature for 10–15 minutes gives the peanut butter base a softer, creamier consistency.
Variations
These optional variations are easy ways to customize your Lunch Lady Peanut Butter Bars. They are not part of the original recipe and may require additional or substituted ingredients.
- Milk chocolate peanut butter bars: Replace the semi-sweet chocolate chips with milk chocolate chips for a sweeter, creamier chocolate topping.
- Dark chocolate peanut butter bars: Use dark chocolate chips for a deeper chocolate flavor that contrasts with the sweet peanut butter base.
- Crunchy peanut topping: Sprinkle chopped roasted peanuts over the melted chocolate before refrigerating for extra crunch and peanut flavor.
- Sea salt chocolate bars: Add a light sprinkle of flaky sea salt to the chocolate topping before it sets for a sweet-and-salty contrast.
- Holiday peanut butter bars: Decorate the melted chocolate topping with festive sprinkles before chilling to make the bars suitable for Christmas, Halloween, or other celebrations.
How to Store
These Lunch Lady Peanut Butter Bars are best kept in the refrigerator to maintain their firm chocolate topping and thick peanut butter base.
Once the bars are completely set, transfer them to an airtight container. If stacking them, separate the layers with parchment paper to keep the chocolate surfaces from sticking together.
Refrigerator storage duration: [Not provided].
Freezing and thawing instructions: [Not provided].
For the best texture, remove the bars from the refrigerator and allow them to sit at room temperature for 10–15 minutes before serving.
Since the bars require chilling, they can also be prepared ahead of a gathering and refrigerated until needed.
Serving Suggestions
- School lunch nostalgia: Serve these classic peanut butter bars as an after-school treat or an old-fashioned cafeteria-inspired dessert.
- Potlucks and family gatherings: Arrange the bars on a dessert platter for an easy, shareable treat.
- Holiday dessert trays: Include them alongside Christmas cookies, homemade fudge, and other chocolate treats.
- Afternoon snacks: Enjoy a bar with a glass of cold milk or a cup of coffee.
- Birthday parties: Cut the bars into smaller portions for a dessert table with other bite-sized sweets.
- Chocolate and peanut butter dessert platters: Pair them with peanut butter cookies, chocolate brownies, or homemade candy for a variety of flavors and textures.
The recipe yields 16 bars, making it a convenient choice for sharing with friends and family.
Frequently Asked Questions
What are Lunch Lady Peanut Butter Bars?
Lunch Lady Peanut Butter Bars are a nostalgic dessert inspired by the peanut butter bars traditionally served in school cafeterias. They typically feature a sweet, thick peanut butter base and a chocolate topping.
This no-bake version uses graham cracker crumbs, powdered sugar, melted butter, and creamy peanut butter for the base, topped with melted semi-sweet chocolate and additional peanut butter.
Do I need to bake Lunch Lady Peanut Butter Bars?
No. This recipe is completely no-bake. The peanut butter base is mixed together without heating, and the chocolate topping is melted in the microwave.
The assembled bars are refrigerated for 1 hour until firm.
Can I use crunchy peanut butter instead of creamy peanut butter?
Creamy peanut butter is recommended because it creates the smooth texture specified in the original recipe.
Crunchy peanut butter may work as a variation, but it will add peanut pieces and change the consistency of the base and topping.
Why should I cut the bars before refrigerating?
Cutting the bars while the chocolate topping is still soft makes them easier to portion.
Once refrigerated, the chocolate becomes firm and may be more likely to crack when sliced. Cutting before chilling helps create more even squares.
How long do Lunch Lady Peanut Butter Bars need to chill?
The bars need 1 hour in the refrigerator, or until completely firm.
After chilling, let them sit at room temperature for 10–15 minutes before serving for the best texture.
Can I make these peanut butter bars ahead of time?
Yes. These bars are convenient to prepare ahead because they need refrigeration to set.
Once firm, keep them in an airtight container in the refrigerator and allow them to rest at room temperature for 10–15 minutes before serving.
Recipe Card
Lunch Lady Peanut Butter Bars
Equipment
- 9 × 9-inch baking dish
- Parchment paper
- Large mixing bowl
- Stand mixer or handheld mixer
- Microwave-safe bowl
- Measuring cups and spoons
- Rubber spatula
- Knife
- Refrigerator
Ingredients
Peanut Butter Base
- ¾ cup butter melted
- 2 cups graham cracker crumbs
- 2 cups powdered sugar
- 1¼ cups creamy peanut butter
Chocolate Topping
- 2½ cups semi-sweet chocolate chips
- 3 tablespoons creamy peanut butter
Instructions
- Line a 9 × 9-inch baking dish with parchment paper and set aside.
- In a large mixing bowl, combine the melted butter, graham cracker crumbs, and powdered sugar using a stand mixer or handheld mixer until well blended.
- Add 1¼ cups creamy peanut butter and continue mixing just until all ingredients are fully incorporated.
- Transfer the peanut butter mixture into the prepared baking dish. Press and spread evenly across the bottom to create a smooth, compact layer.
- In a microwave-safe bowl, combine the semi-sweet chocolate chips and the remaining 3 tablespoons creamy peanut butter.
- Microwave in 30-second intervals, stirring thoroughly after each interval, until the chocolate is completely melted and the mixture is smooth and creamy.
- Pour the melted chocolate mixture over the peanut butter base, spreading it evenly to cover the entire surface.
- While the chocolate topping is still soft, cut the mixture into 16 squares directly in the pan.
- Refrigerate for 1 hour, or until the bars are completely firm.
- Remove the bars from the refrigerator and let them sit at room temperature for 10–15 minutes before serving.