Easy Halloween Truffles with Oreo Mummy Decorations
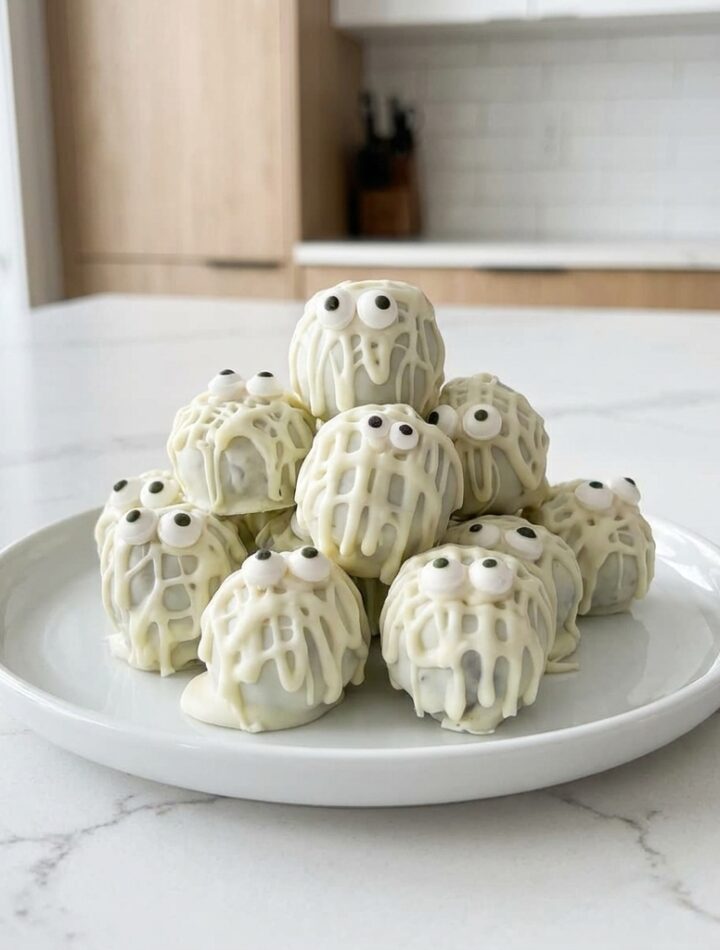
These Halloween Truffles turn Oreo cookies and cream cheese into little mummies with white chocolate bandages and candy eyes. Inside each one is a soft, rich cookies-and-cream center, wrapped in a sweet coating that gives every bite a little snap. They’re playful enough for a Halloween party and simple enough to decorate without precise piping skills.
The filling comes together with just two ingredients, and there’s no baking involved. After an hour in the refrigerator, the truffles are ready to dip and decorate. The best part? Uneven drizzles make perfectly convincing mummy bandages, so each truffle can have its own slightly goofy personality.
Why You’ll Love This Recipe
- No baking required: Your oven stays off from start to finish.
- Four main ingredients: A short shopping list covers the filling, coating, and decorations.
- Rich cookies-and-cream flavor: Oreo crumbs and cream cheese make a soft, chocolatey center.
- Forgiving decorating: Overlapping chocolate lines create the mummy look without intricate designs.
- Party-friendly yield: One batch makes 24 individual truffles.
Equipment
- Food processor
- Large mixing bowl
- Mixing spoon or spatula
- Cookie scoop, ideally 1½ inches
- Baking sheet or plate
- Wax paper
- Candy melter, or a double boiler or microwave-safe bowl
- Dipping fork
- Pastry bag fitted with a thin tip
Ingredients
These four ingredients make the Oreo filling, white coating, and little candy faces.
- 14.3-ounce package Oreos
- 8 ounces cream cheese, softened
- 18 ounces white chocolate wafers or candy melts
- 48 candy eyeballs
Optional dipping adjustments from the original recipe: You may need about 3 ounces of additional white chocolate wafers if cookie crumbs build up in the coating. A small amount of vegetable oil may also be added if the coating is too thick. These are conditional additions, separate from the main ingredient quantities.
Ingredient Notes & Substitutions
Oreos: Process the whole cookies, including their filling, into fine crumbs. Large pieces make it harder to mix and shape a smooth truffle center.
Cream cheese: Let it soften so it blends evenly with the crumbs. Mix thoroughly until there are no visible streaks of cream cheese.
White chocolate wafers or candy melts: Either option is included in the original recipe. Candy melts and white chocolate can differ in flavor and consistency, so watch the texture as you melt them.
Candy eyeballs: Each mummy gets two eyes, so 48 eyeballs decorate all 24 truffles. Small dots of melted coating act as the glue.
How to Make Halloween Truffles
- Crush the Oreos. Add the cookies to a food processor and blend into fine crumbs. Stop and pulse as needed to break down any larger pieces.
- Mix the filling. Transfer the crumbs to a large bowl. Add the softened cream cheese and mix until fully combined. The mixture should look evenly blended and hold together when shaped.
- Form the truffles. Use a cookie scoop or your hands to shape the mixture into 24 balls, about 1½ inches each.
- Chill for 1 hour. Place the balls on a wax paper-lined baking sheet or plate. Refrigerate for 1 hour to firm up the filling before dipping.
- Melt the coating. Melt the white chocolate wafers or candy melts in a candy melter, then keep it on the warm setting. Alternatively, use a double boiler or microwave at 70% power in 30-second intervals, stirring after each interval.
- Dip each truffle. Lower the chilled Oreo balls into the melted coating one at a time, turning to coat them completely.
- Transfer to wax paper. Lift each truffle with a dipping fork and place it on wax paper. Carefully slide the fork out from underneath and let the coating set.
- Adjust the coating if needed. If Oreo crumbs make the melted coating too crumbly, add about 3 ounces of fresh white chocolate wafers and melt until smooth. If it is simply too thick for dipping, stir in a small amount of vegetable oil, a little at a time.
- Pipe the mummy bandages. Transfer some melted coating to a pastry bag fitted with a thin tip. Drizzle over each set truffle in two directions to create overlapping bandages.
- Attach the eyes. Add two small dots of melted coating to each truffle and press a candy eyeball onto each dot.
- Let the decorations set. Allow the coating and decorations to firm completely before serving.
Tips for Success
- Start with fine crumbs. A few extra pulses help eliminate cookie chunks that can make the filling uneven.
- Soften the cream cheese first. It should blend easily into the crumbs without leaving streaks.
- Use a scoop for consistent portions. A 1½-inch scoop helps you shape the batch more quickly.
- Give the filling its full hour to chill. Firm centers are easier to handle during dipping.
- Keep the coating warm and fluid. The candy melter’s warm setting helps maintain a workable consistency.
- Use oil sparingly. If needed, add only a little at a time and check the consistency before adding more.
- Let the base coating set before piping. This keeps the mummy bandages visible on the surface.
Variations
These optional decorating ideas change the appearance while keeping the original Oreo filling.
- Colorful mummies: Use colored candy melts for the bandages over the white base coating.
- Chocolate bandages: Pipe melted milk or dark chocolate over the white coating for a contrasting design.
- Halloween sprinkle truffles: Skip the bandages and decorate the freshly dipped truffles with Halloween sprinkles before the coating sets.
How to Store
Refrigerator
Keep the finished truffles in an airtight container in the refrigerator. Because they contain cream cheese, they should stay refrigerated between servings; Oreo’s own cookie-ball recipe gives the same refrigeration guidance.
For a conservative storage window, use them within 1 week, or freeze them for longer storage. Comparable Oreo-and-cream-cheese truffle recipes recommend this timeframe; the supplied recipe’s 2-week refrigerator claim has not been verified.
Freezer
Following the supplied recipe, freeze for up to 2 months in an airtight, freezer-safe container. Separate stacked layers with wax paper to protect the decorations.
Thaw in the refrigerator before serving. For the neatest presentation, you can freeze the coated truffles and add the bandages and candy eyes after thawing.
Serving Suggestions
- Arrange the mummies on a dark platter to show off their white chocolate bandages.
- Add them to a Halloween dessert table with cookies, brownies, and other small treats.
- Serve a chilled batch for a Halloween movie night.
- Bring them to a fall gathering where they can remain refrigerated until serving.
Frequently Asked Questions
Do I remove the cream filling from the Oreos?
No. Use the whole cookies, including the filling, when making the crumbs.
Can I make Halloween truffles without a candy melter?
Yes. Use a double boiler, or microwave the coating at 70% power in 30-second intervals, stirring after each interval.
Why is my white chocolate too thick for dipping?
The coating may need gentle warming, or it may have picked up cookie crumbs. Keep it warm and stir. The original recipe also allows a little vegetable oil for thinning, or about 3 ounces of fresh wafers if crumbs have made the coating difficult to work with.
Do I have to chill the Oreo balls?
Yes. This recipe calls for 1 hour in the refrigerator before dipping. That time helps the filling firm up so the balls are easier to coat.
How do I get the candy eyes to stick?
Use two small dots of melted coating as glue, then gently press an eyeball onto each dot. Let the coating set before handling.
Can I freeze these truffles?
Yes. The supplied recipe allows freezing for up to 2 months. Store them in an airtight freezer-safe container and thaw in the refrigerator.
Recipe Card

Halloween Truffles
Equipment
- Food processor
- Large mixing bowl
- Mixing spoon or spatula
- 1½-inch cookie scoop
- Baking sheet or plate
- Wax paper
- Candy melter, double boiler, or microwave-safe bowl
- Dipping fork
- Pastry bag with a thin tip
Ingredients
- 14.3- ounce package Oreos
- 8 ounces cream cheese softened
- 18 ounces white chocolate wafers or candy melts
- 48 candy eyeballs
Instructions
- Process the Oreos into fine crumbs. Transfer to a bowl and mix with the softened cream cheese until fully combined.
- Shape into 24 balls, about 1½ inches each. Place on a wax paper-lined baking sheet or plate.
- Refrigerate for 1 hour.
- Melt the white chocolate in a candy melter and keep warm. Alternatively, use a double boiler or microwave at 70% power in 30-second intervals, stirring between intervals.
- Dip each chilled ball into the coating. Lift with a dipping fork, transfer to wax paper, and let set.
- If crumbs make the coating difficult to work with, melt in about 3 ounces of additional white chocolate wafers. If too thick, add a small amount of vegetable oil gradually.
- Pipe melted coating over the truffles in two directions to create mummy bandages.
- Attach two candy eyeballs to each truffle with small dots of melted coating.
- Let the decorations set completely. Keep refrigerated until serving.