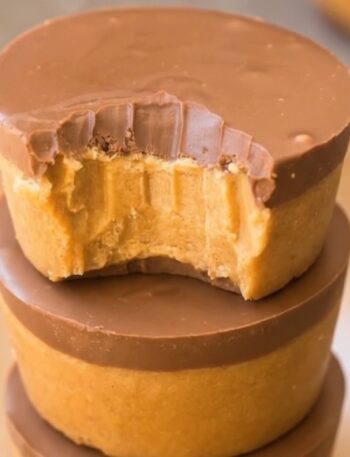
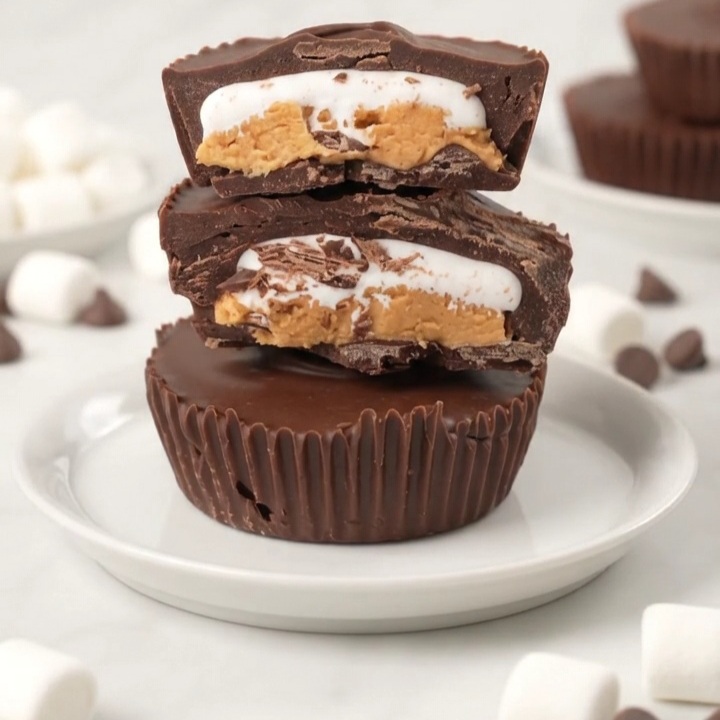
These peanut butter marshmallow cups tuck two sweet layers inside a semisweet chocolate shell: smooth peanut butter filling and soft marshmallow creme. Each bite brings together rich chocolate, nutty peanut butter, and a fluffy center. They’re a fun homemade candy for anyone who likes a little extra sweetness in a classic peanut butter cup.
You’ll need five ingredients, a muffin pan, and a handheld mixer. The assembly happens in stages, with short freezer breaks to firm up each layer before adding the next. Make a batch for a movie night, a holiday candy platter, or an after-dinner treat. The recipe makes 12 cups, and the paper liners give them their familiar ridged edges.
Why You’ll Love This Recipe
- Five ingredients: A short list makes shopping and prep straightforward.
- No oven needed: Melt the chocolate in the microwave and set the layers in the freezer.
- Two creamy fillings: Peanut butter and marshmallow creme give each cup a distinct center.
- Easy to portion: A standard muffin pan makes 12 individual treats.
- Simple decorating: The chocolate shell and cupcake liners give the cups a finished look without extra toppings.
Equipment
- Standard 12-cup muffin pan
- 12 paper cupcake liners
- Microwave-safe bowl
- Mixing bowl
- Handheld mixer
- Measuring cups and spoons
- Spoon or small spatula
- Airtight storage container
- Parchment paper for stacking
Ingredients
Measure the chocolate chips into two portions before starting: ¾ cup for the bases and 1 cup for the tops.
- 1¾ cups semi-sweet chocolate chips, divided into ¾ cup and 1 cup
- ½ cup creamy peanut butter
- 6 tablespoons powdered sugar
- 1½ tablespoons unsalted butter, at room temperature
- 4 tablespoons marshmallow creme
Ingredient Notes & Substitutions
Semisweet chocolate chips: These form the chocolate bases and tops. Keep the two portions separate so you have enough chocolate to cover the filling completely.
Creamy peanut butter: This gives the center its smooth, nutty flavor. Stir it well before measuring if needed so the consistency is even.
Powdered sugar: Powdered sugar blends into the peanut butter filling without the gritty texture granulated sugar would leave. Keep the amount at 6 tablespoons.
Unsalted butter: Use butter softened to room temperature so it blends smoothly with the peanut butter and sugar. The recipe calls for softened butter, not melted butter.
Marshmallow creme: Use the spreadable creme specified in the recipe. Whole marshmallows won’t spread into the same thin layer and aren’t a direct substitute here.
How to Make Peanut Butter Marshmallow Cups
- Prepare the pan. Line a standard 12-cup muffin pan with paper cupcake liners.
- Melt the chocolate for the bases. Place ¾ cup chocolate chips in a microwave-safe bowl. Microwave in 30-second intervals, stirring after each, until smooth. This may take about 1½–2 minutes, depending on your microwave.
- Make the chocolate bases. Divide the melted chocolate among the liners, using approximately ½ tablespoon per cup. Spread it evenly across the bottoms. Freeze for 10 minutes.
- Mix the peanut butter filling. Meanwhile, beat the peanut butter, powdered sugar, and softened butter with a handheld mixer on medium speed until smooth.
- Add the peanut butter layer. Spoon 2 teaspoons of filling into the center of each chocolate base. Flatten gently, leaving a small gap between the filling and the liner. Freeze for 10 minutes.
- Add the marshmallow layer. Place 1 teaspoon marshmallow creme in the center of each cup. Smooth it gently with a lightly damp fingertip, keeping it away from the edges. Freeze for another 10 minutes.
- Melt the remaining chocolate. Shortly before the chilling time ends, microwave the remaining 1 cup chocolate chips in 30-second intervals, stirring after each until smooth.
- Seal the cups. Spoon the melted chocolate over each filling. Use the back of a spoon to spread it all the way to the edges, completely covering the peanut butter and marshmallow creme.
- Freeze and serve. Freeze for a final 10 minutes, until the chocolate tops are firm. Peel away the liners to serve. For a softer bite, let the cups sit briefly at room temperature.
Tips for Success
- Divide the chocolate first. Set aside ¾ cup for the bottoms and 1 cup for the tops before melting.
- Start with softened butter. Firm butter can leave small lumps in the peanut butter filling.
- Keep the fillings centered. The gap around the edges gives the chocolate room to seal the cups.
- Use a lightly damp fingertip for the creme. This helps smooth the sticky marshmallow layer without pulling it out of place.
- Follow each freezer interval. Firming the layers between additions makes assembly easier.
- Stir between microwave intervals. Stop heating as soon as the chocolate melts and becomes smooth.
- Check the chocolate seal. Spread the top layer to the liner on every side so no filling remains exposed.
Variations
These optional ideas change the chocolate or add a finishing touch. Keep the original filling quantities the same.
- Milk chocolate cups: Use milk chocolate chips in place of the semisweet chips for a sweeter shell, keeping the same total amount and division.
- Dark chocolate cups: Use dark chocolate chips for a stronger chocolate flavor.
- Salted chocolate tops: Sprinkle a tiny pinch of flaky sea salt over the tops before the final freeze.
- Holiday cups: Add a few seasonal sprinkles while the top chocolate layer is still soft.
How to Store
Keep the finished cups in an airtight container in the refrigerator. Place parchment paper between stacked layers.
For a softer bite, let a serving sit briefly at room temperature before enjoying.
Refrigerator storage duration: [Not provided].
The freezer is used to set the layers during assembly. Long-term freezer storage and thawing instructions were not provided.
Serving Suggestions
- Add the cups to a holiday candy platter alongside other small sweets.
- Serve one with coffee or a glass of milk for an afternoon treat.
- Arrange them on a dessert tray for a birthday party or casual gathering.
- Enjoy them as a movie-night dessert, allowing them to soften briefly before serving.
Frequently Asked Questions
Do peanut butter marshmallow cups need to be baked?
No. The chocolate melts in the microwave, and the layers firm up in the freezer. No oven is needed.
Can I skip the freezer breaks?
Follow the four 10-minute freezer intervals for the intended assembly. They help firm each layer before you add the next and set the finished chocolate tops.
Why should the filling stay away from the edges?
Leaving a small gap allows the chocolate topping to reach around the filling and seal against the base. Filling pressed against the liner can leave exposed spots.
Can I use regular marshmallows instead of marshmallow creme?
They aren’t a direct substitute in this method. Marshmallow creme spreads into the thin, soft layer described in the recipe.
Why is my peanut butter filling lumpy?
The butter may have been too firm. Use room-temperature butter and beat the filling on medium speed until smooth before portioning it.
How do I make the chocolate shell easier to bite?
Let the finished cups sit briefly at room temperature before serving. Keep the remaining cups refrigerated.
Recipe Card
Easy Peanut Butter Marshmallow Cups
Equipment
- Standard 12-cup muffin pan
- 12 paper cupcake liners
- Microwave-safe bowl
- Mixing bowl
- Handheld mixer
- Measuring cups and spoons
- Spoon or small spatula
Ingredients
- 1¾ cups semi-sweet chocolate chips divided into ¾ cup and 1 cup
- ½ cup creamy peanut butter
- 6 tablespoons powdered sugar
- 1½ tablespoons unsalted butter at room temperature
- 4 tablespoons marshmallow creme
Instructions
- Line a standard 12-cup muffin pan with paper cupcake liners.
- Microwave ¾ cup chocolate chips in 30-second intervals, stirring after each until smooth, about 1½–2 minutes, depending on your microwave.
- Divide the melted chocolate among the liners, using approximately ½ tablespoon per cup. Spread across the bottoms and freeze for 10 minutes.
- Beat the peanut butter, powdered sugar, and softened butter on medium speed until smooth.
- Add 2 teaspoons peanut butter filling to each chocolate base. Flatten gently, leaving a gap around the edges. Freeze for 10 minutes.
- Add 1 teaspoon marshmallow creme to each center. Smooth with a lightly damp fingertip, keeping it away from the edges. Freeze for 10 minutes.
- Shortly before the chilling time ends, melt the remaining 1 cup chocolate chips in 30-second microwave intervals, stirring until smooth.
- Spoon the chocolate over the fillings and spread to the edges to seal.
- Freeze for a final 10 minutes, until firm. Remove the liners to serve.