
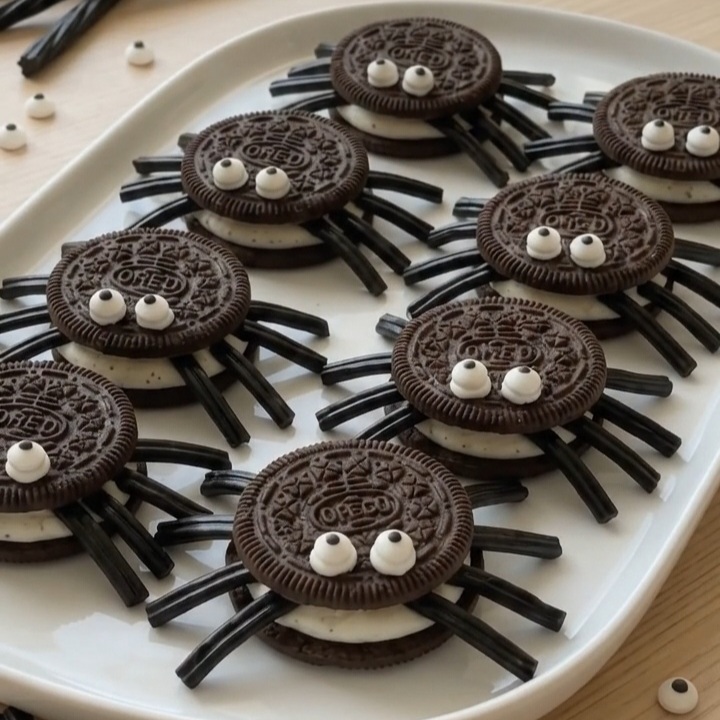
These no-bake Oreo spider cookies turn chocolate sandwich cookies into little Halloween treats with chewy licorice legs and candy eyes. Each one keeps that familiar crunchy cookie and creamy filling, with a little extra sweetness from the decorating icing. They look playful on a platter, and you don’t need to bake, melt chocolate, or pull out a mixer.
With 15 minutes of prep and four ingredients, this recipe is easy to fit into your Halloween plans. Make a dozen for a party, a movie-night snack, or a dessert table. The decorating is simple: tuck in the legs, secure the cookie tops, and give each spider a pair of eyes.
Why You’ll Love This Recipe
- No baking or heating: Everything comes together right on the tray.
- Four ingredients: Oreos, licorice rope, candy eyes, and decorating icing.
- Quick preparation: The recipe lists just 15 minutes of prep.
- Simple decorating: Small dots of icing hold the eyes in place.
- Individual treats: The batch makes 12 cookies that are easy to arrange and serve.
Equipment
- Tray or baking sheet
- Parchment paper
- Ruler
- Kitchen scissors or a knife for cutting the licorice
- Small spoon or piping bag for the icing
Ingredients
Cut the licorice before you begin so the pieces are ready to tuck into the cookie filling.
- 12 Oreo cookies
- 16 feet black licorice rope, cut into 96 two-inch pieces
- 24 candy eyes
- 4 oz white decorating icing
Ingredient Notes & Substitutions
Oreo cookies: Twist the cookies apart gently, keeping as much filling as possible on one half. The filling helps anchor the legs before you replace the top.
Black licorice rope: Choose thin, flexible rope that fits between the cookie halves. Each spider needs eight two-inch pieces. Thick licorice twists can make it difficult to close the cookies without breaking them.
Candy eyes: Two eyes per cookie give each spider its face. Attach them with small dots of icing rather than pressing directly onto the dry cookie.
White decorating icing: The icing secures both the cookie halves and the eyes. A thick decorating icing is easier to control than a runny glaze.
Cookie substitution: Another similarly sized chocolate sandwich cookie can work, provided it separates cleanly and has enough filling to hold the licorice ends.
How to Make No-Bake Oreo Spider Cookies
- Separate the cookies. Gently twist apart each Oreo. Place the halves with the most cream filling facing up on a parchment-lined tray.
- Arrange the legs. Set eight licorice pieces on each cream-covered half, with four extending from each side. Rest the inner ends in the filling and press gently to anchor them.
- Replace the tops. Spread or pipe a little white icing onto the inside of each matching cookie half. Place it over the legs and press lightly until the cookie holds together.
- Attach the eyes. Add two small dots of icing to the top of each cookie. Gently press one candy eye onto each dot.
- Let the icing firm up. Leave the Oreo spider cookies undisturbed for a few minutes before serving. If desired, add a tiny icing smile beneath the eyes for a friendly face.

Tips for Success
- Cut all 96 legs first. Having the licorice ready makes assembly quicker and keeps the pieces consistent.
- Twist instead of pulling. A gentle twisting motion helps separate the cookie halves without snapping them.
- Keep the filling facing up. Use the half with the most filling as the base for the legs.
- Spread out the licorice ends. Lay them beside one another rather than piling them in the center, which can prevent the top from sitting securely.
- Press lightly. Too much pressure can crack the cookie or push out the filling.
- Use small icing dots for the eyes. Just enough icing to secure each eye keeps the faces tidy.
- Allow setting time before moving. The legs and eyes are easier to disturb while the icing is still soft.
Variations
These optional decorating ideas are separate from the original version.
- Smiling spiders: Pipe the suggested tiny white icing smile beneath each pair of eyes.
- Colorful legs: Swap the black licorice rope for a similarly thin, flexible candy rope in another color. Keep the same number and length of pieces.
- Golden cookie spiders: Use similarly sized vanilla sandwich cookies for a lighter-colored version with the same assembly method.
How to Store
Once the icing has firmed up, place the cookies in a single layer in an airtight container. Leave enough room around the legs so they do not bend or detach.
If the decorating icing’s label permits room-temperature storage after opening, keep the cookies in a cool, dry place. Follow the label if it requires refrigeration.
Storage duration: [Not provided]. For the neatest presentation and crispest cookies, assemble close to serving time.
Freezing: A tested freezing and thawing method was not provided. These decorated cookies are best treated as a fresh assembly project.
Serving Suggestions
- Arrange the spiders in a single layer on a Halloween dessert platter.
- Set them around a bowl of wrapped candy as an edible table decoration.
- Serve alongside brownies or other small treats at a Halloween party.
- Add a few to a snack tray for a spooky movie night.
Use a wide platter so the licorice legs have space and guests can pick up each cookie without disturbing its neighbors.
Frequently Asked Questions
How many legs does each Oreo spider cookie need?
Each cookie gets eight legs, with four on either side. For 12 cookies, you’ll need 96 two-inch licorice pieces.
How do I keep the cookie tops from falling off?
Spread or pipe a little icing onto the inside of the top half before replacing it. Press gently, then leave the assembled cookie undisturbed while the icing firms up.
Can I use thick licorice twists instead of rope?
Thin licorice rope is better suited to this recipe. Thick twists can hold the cookie halves too far apart and make assembly difficult.
Do these cookies need to go in the oven or refrigerator to set?
No oven time is needed, and the recipe does not call for chilling. Leave the cookies undisturbed for a few minutes so the decorating icing can firm up, following any additional directions on its label.
Can I prepare anything ahead of time?
Yes. Cut the licorice into two-inch pieces and count out the candy eyes before assembling. Keep the cookies sealed until you’re ready to decorate them.
Can I make these without a piping bag?
Yes. Use a small spoon to spread icing inside the cookie halves and place small dots on top for the eyes. A piping bag is helpful for the optional smile but is not necessary for the basic design.
Recipe Card

No-Bake Oreo Spider Cookies
Equipment
- Tray or baking sheet
- Parchment paper
- Ruler
- Kitchen scissors or knife
- Small spoon or piping bag
Ingredients
- 12 Oreo cookies
- 16 feet black licorice rope cut into 96 two-inch pieces
- 24 candy eyes
- 4 oz white decorating icing
Instructions
- Gently twist apart each Oreo. Place the halves with the most cream filling facing up on a parchment-lined tray.
- Arrange eight licorice pieces on each cream-covered half, four on either side. Gently press the ends into the filling.
- Spread or pipe a little icing onto the inside of the matching cookie halves. Replace them over the legs and press lightly.
- Add two small dots of icing to the top of each cookie, then press a candy eye onto each dot.
- Leave undisturbed for a few minutes so the icing can firm up before serving.
- Tip: Cut all the licorice pieces before assembling.